Building a REST API using Spring Boot
Hello Guys, In this medium blog, I'll teach you how to create a fully functional REST API with all the necessary CRUD operations.
Creating a Project
You can initalize a springboot project from Spring Initializr website and here I’m going to create a maven project with Java language support. As the spring boot version, you can use the default version they recommend. In the project metadata section, define necessary artifact related meta data.
And most importantly make sure to add the following dependencies (Spring Web, Lombok, Spring Data JPA and H2 Database)to your Spring Boot project.

I’m using IntelliJ IDEA as my default code editor and you can use any suitable code editor you comfortable with. So we are going to use the following directory structure to organize our artifacts. This seperation of concern will be more clean, cohesive and easy to maintain our codebase.
- Controller — REST API definitions.
- Model — Schemas for our database objects.
- Repository — Interface to access the database and the related features.
- Service — Backend business logics.

Model
Let’s start modelling from our initial model which is “Post”. Here I’m going to keep the model as simple as possible by defining only few fields because i don’t want to introduce the additional complexities to the project.
Since we have used Lombok dependency we can easily create our contructors, and standard setters and getters on the fly. This makes our code more clean, readable and simple as much as possible.
@Entity defines the class as a database entity reference.
@Data defines all the necessary standard getters and setters.
@NoArgsContructor defines the no-args constructor.
@AllArgsConstructor defines the default constructor with all arguments.
package com.simpleepic.springbootcicd.model;

import jakarta.persistence.Entity;
import jakarta.persistence.GeneratedValue;
import jakarta.persistence.GenerationType;
import jakarta.persistence.Id;
import lombok.AllArgsConstructor;
import lombok.Data;
import lombok.NoArgsConstructor;

@Entity
@Data
@NoArgsConstructor
@AllArgsConstructor
public class Post {
    @Id
    @GeneratedValue(strategy = GenerationType.IDENTITY)
    private Long id;

    private String content;
}
@Id points to auto generated unique identifier values. Therefore user don’t need to explicitly define id values since its automatically assigned once the data is inserted to the database.
Repository
Now we can create and interface class to access about database functionalities. Since we added Data JPA dependency it follows Object Relational Mapping(ORM). Therefore as developers, we don’t need to aware of database level related implementations since ORM handles automatically for us. So all we have to do is that simply use the functionalities that are exposed by the Data JPA to invoke any necessary database related function.
Make sure to annotate your repository interface with @Repository annotation.
package com.simpleepic.springbootcicd.repository;

import com.simpleepic.springbootcicd.model.Post;
import org.springframework.data.jpa.repository.JpaRepository;
import org.springframework.stereotype.Repository;

@Repository
public interface PostRepository extends JpaRepository<Post, Long> {
}
Service
Now we can focus on our underline business logics. Here I’ve been focused to all the CRUD operations and based on your requirements you can add additional functions.
Note that since we are going to persist our data using H2 Database we need to construct an object of our PostRepository. Then we can access required functions that are exposed by Data JPA to perform our database related functions.
For instance if we consider getPostById function, you can see that in order to search a post by id, all we have have to call findById() function over postRepository. So It’s very easy to use ORM such as Data JPA to perform our data layer related actions.
package com.simpleepic.springbootcicd.service;

import com.simpleepic.springbootcicd.model.Post;
import com.simpleepic.springbootcicd.repository.PostRepository;
import org.springframework.beans.factory.annotation.Autowired;
import org.springframework.stereotype.Service;

import java.util.List;

@Service
public class PostService {
    @Autowired
    private final PostRepository postRepository;

    public PostService(PostRepository postRepository) {
        this.postRepository = postRepository;
    }

    public List<Post> getPosts() {
        return postRepository.findAll();
    }

    public  Post getPostById(Long id) {
        return postRepository.findById(id).get();
    }

    public Post createPost(Post post) {
        return postRepository.save(post);
    }

    public Post updatePost(Post post, Long id){
        Post postFound = postRepository.findById(id).get();

        if(postFound != null){
            postFound.setContent(post.getContent());

            return postRepository.save(postFound);
        }

        return null;
    }

    public void deletePost(Long id) {
        Post postFound = postRepository.findById(id).get();

        if(postFound != null) {
            postRepository.deleteById(id);
        }
    }
}
Controller
Finally, let’s start structuring our controller class, which is our RESTful API definitions. Here I have been created all the necessary API definitions to perform basic CRUD operations.
Since @RequestMapping annotation has been defined all the above requests are staring from “/api/v1/post” and follow the rest of the API definitions based on the relevant request mapping such as GET, POST, PUT, DELETE.
Note that, since we are going to service layer business logics, first we have to initialize an construct an object of postService.
package com.simpleepic.springbootcicd.controller;

import com.simpleepic.springbootcicd.model.Post;
import com.simpleepic.springbootcicd.service.PostService;
import org.springframework.beans.factory.annotation.Autowired;
import org.springframework.web.bind.annotation.*;

import java.util.List;

@CrossOrigin(origins = "*", maxAge = 3600)
@RestController
@RequestMapping("/api/v1/post")
public class PostController {
    @Autowired
    private final PostService postService;

    public PostController(PostService postService) {
        this.postService = postService;
    }

    @GetMapping("/")
    public List<Post> getPosts() {
        return postService.getPosts();
    }

    @GetMapping("/{id}")
    public Post getPostById(@PathVariable Long id) {
        return postService.getPostById(id);
    }

    @PostMapping("/")
    public Post createPost(@RequestBody Post post) {
        return postService.createPost(post);
    }

    @PutMapping("/{id}")
    public Post updatePost(@RequestBody Post post, @PathVariable Long id) {
        return postService.updatePost(post, id);
    }

    @DeleteMapping("/{id}")
    public void deletePost(@PathVariable Long id) {
        postService.deletePost(id);
    }
}
Run the application
Then simply run your spring boot application by clicking the Run button. However if you are using a different IDE rather than IntelliJ IDEA, the execution process of the application may different.
Once you run it correctly the log should look like this.

Test the APIs
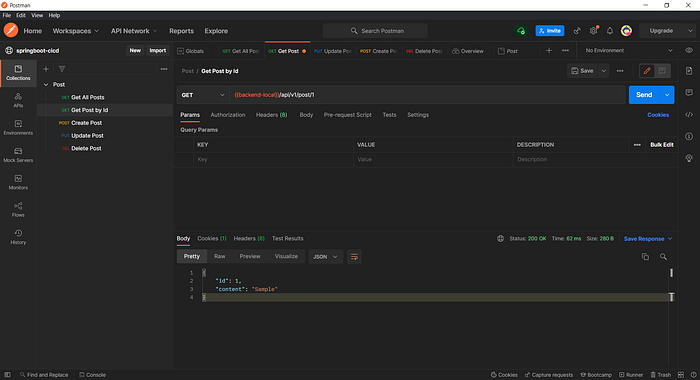
Now we can you Postman to send request to our exposed APIs. Make sure you have run your application correctly and by default it will run on the default port 8080. So we can define a global variable to declare our base URL as http://localhost:8080
Go to postman Environments>Globals and create a new variable called backend-local and assign the value as http://localhost:8080

Now we can create a collection to check all our APIs. First let’s start from Creating a post.
Note that you can easily create a collection using Collections tab and create a Collection called Post. Within this collection you can define all the necessary API requests.


Great!!! All the APIs work as we expected. Note that you add more APIs and features to your application depending on your requirements. Also you can find out the source code at my GitHub via the below link.
GitHub: https://github.com/simpleepic/springboot-cicd
Alright, So hope you have learn something and if you think this blog was helpful for you make sure to give a clap and share with your fellow developers. Thank you.