Creating a Web Server using C
Hello developer. In this article, I’m going to show you how to create a fully functional web server using C language.
File and Folder Structure
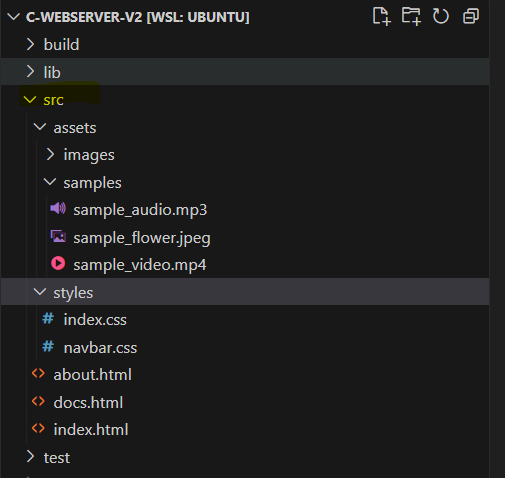
We are going to use following directory structure to organize our web server artifacts.
/lib — Necessary custom library files.
/src — HTML pages and other web page related data. (such as images, videos etc)
/test — Test functions to test our libraries.
server.c — Main server to handle user requests and response back the HTML pages.
utils.c — Utility functions to execute server side activities.

File Helpers
Let’s start from implementing our library functions. Then we can reuse those functions in other C files as headers.
Note that since the server is going to respond back HTML pages, we first need a way to read those files from the hard disk. Therefore we can create a function called get_file_descriptor() to open file.
This function basically take the directory and file name from parameters and try to build the full directory and open the actual file.
If file exists, then fucntion will return the file pointer or descriptor, if not it returns -1 to indicate file is not found.
#include <fcntl.h>
#include <stdio.h>
#include <string.h>

int get_file_descriptor(const char *directory, const char *file_name)
{
    char src_file[100];
    strcpy(src_file, directory);
    strcat(src_file, file_name);

    int file_descriptor = open(src_file, O_RDONLY);

    return file_descriptor;
}
Then we can create another funtion called get_file_extension() to read and extract the file type. This is required because in the HTML context we are going encode our payloads in MIME format.
If the filename follows FILE_NAME.file_type then it return file_type as result, else it returns empty string “”.
const char *get_file_extension(const char *file_name)
{
    const char *dot = strrchr(file_name, '.');

    if(!dot || dot == file_name)
    {
        return "";
    }

    return dot + 1;
}
HTTP Helpers
Now we can start working on our HTTP related libraries. As the title suggest, we need set of functions to handle the HTML related data transformations and encoding/decoding mechanisms.
First we can create a function called get_mime_type() to get the related MIME type once the actual file type is given.
#include <string.h>
#include <stdlib.h>

const char *get_mime_type(const char *file_ext)
{
    if (strcasecmp(file_ext, "html") == 0 || strcasecmp(file_ext, "htm") == 0)
    {
        return "text/html";
    }
    else if (strcasecmp(file_ext, "txt") == 0)
    {
        return "text/plain";
    }
    else if (strcasecmp(file_ext, "jpg") == 0 || strcasecmp(file_ext, "jpeg") == 0)
    {
        return "image/jpeg";
    }
    else if (strcasecmp(file_ext, "png") == 0)
    {
        return "image/png";
    }
    else
    {
        return "application/octet-stream";
    }
}
Then we can create a function called url_decode() that handles the decodings of the URL requests. This means that, if the user requested URL contains any hexadecimal values it decode those values into UNICODE format.
For instance %20 means space and %23 means #.
char *url_decode(const char *src)
{
    size_t src_len = strlen(src);
    char *decoded = malloc(src_len + 1);
    size_t decoded_len = 0;

    // decode %2x to hex
    for (size_t i = 0; i < src_len; i++)
    {
        if (src[i] == '%' && i + 2 < src_len)
        {
            int hex_val;
            sscanf(src + i + 1, "%2x", &hex_val);
            decoded[decoded_len++] = hex_val;
            i += 2;
        }
        else
        {
            decoded[decoded_len++] = src[i];
        }
    }

    // add null terminator
    decoded[decoded_len] = '\0';
    return decoded;
}
Utilities
Now we can create our utility functions. We are going to use following C libraries and make sure to define a maximum buffer size as BUFFER_SIZE. Also source directory as SRC_DIR that contains HTML and other source files.
#include <stdlib.h>
#include <sys/socket.h>
#include <sys/stat.h>
#include <unistd.h>
#include <regex.h>
#include <stdio.h>
#include <string.h>

#include "./lib/file_helper.h"
#include "./lib/http_helper.h"

#define BUFFER_SIZE 104857600
#define SRC_DIR "./src/"
Considering build_http_response() is one of the most important function in this web server. Because as the name suggest, this function returns responses back to user by reading the actual HTML files that resides in the hard disk.
As the first step, when the user request a resource from the client size we need to return it back to user by attaching necessary header files. Then the client size renderer which is typically a web browser can easily render that content.
Here we are attaching some of the most important HTTP header files such as HTTP/1.1 determines we are going to use HTTP over the connection with the default status 200 OK.
Then we try to open the requested resource(file) and if the file exists then we can continue to the other steps, but if not exists then we response back to user as 404 Not Found which means the requested resource is not found at the server side.
If the requested resource exists, then we need to specify some metadata associated with the resource such as Content-Length.
Once all done we can copy the generated HTTP headers to our response buffer. Also the relevant resource should be copied to the resource buffer as well.
Finally we free the headers then at the next user request we can allocate memory for header generation at the heap. Also close the file stream to avoid unnecessary memory leaks.
void build_http_response(const char *file_name, const char *file_ext, char *response, size_t *response_len)
{
    printf("Considered FILE NAME: %s \n", file_name);

    // build HTTP header
    const char *mime_type = get_mime_type(file_ext);
    char *header = (char *)malloc(BUFFER_SIZE * sizeof(char));
    snprintf(header, BUFFER_SIZE,
             "HTTP/1.1 200 OK\r\n"
             "Content-Type: %s\r\n"
             "\r\n",
             mime_type);

    // Try to open the requeted file and if file not exist, response is 404 Not Found
    int file_fd = get_file_descriptor(SRC_DIR, file_name);
    if (file_fd == -1)
    {
        snprintf(response, BUFFER_SIZE,
                 "HTTP/1.1 404 Not Found\r\n"
                 "Content-Type: text/plain\r\n"
                 "\r\n"
                 "404 Not Found");
        *response_len = strlen(response);
        return;
    }

    // Get file size for Content-Length
    struct stat file_stat;
    fstat(file_fd, &file_stat);
    off_t file_size = file_stat.st_size;
    printf("FILE_DESC: %d  SIZE: %li \n", file_fd, file_size);

    // Copy header to response buffer
    *response_len = 0;
    memcpy(response, header, strlen(header));
    *response_len += strlen(header);

    // Copy file to response buffer
    ssize_t bytes_read;
    while ((bytes_read = read(file_fd, response + *response_len, BUFFER_SIZE - *response_len)) > 0)
    {
        *response_len += bytes_read;
    }

    free(header);
    close(file_fd);
}
Now we can define another very important function called handle_client() to handle client requests. Here, first we recieve data from the client side which is typically a message that request a specific resource from the server.
Then if such request is successfully recieved we can check the request method to determine whether its a GET, PUT, POST, DELETE request. Note that, in this implmentation we are going to focus on GET requests only.
For instance if the user requested a resource, by default it response back the default index.html. Then it extract the requested file type via get_file_extension() function and pass if to build_http_response() function to read and get the response in MIME format with necessary headers attached.
Then the response will be sent to the client via send() function.
Here again we have to free the memory allocations before initiating the next user request.
void *handle_client(void *arg)
{
int client_fd = *((int *)arg);
char *buffer = (char *)malloc(BUFFER_SIZE * sizeof(char));
// receive request data from client and store into buffer
ssize_t bytes_received = recv(client_fd, buffer, BUFFER_SIZE, 0);
if (bytes_received > 0)
{
// check if request is GET
regex_t regex;
regcomp(®ex, "^GET /([^ ]*) HTTP/1", REG_EXTENDED);
regmatch_t matches[2];
if (regexec(®ex, buffer, 2, matches, 0) == 0)
{
// Get the file name from encoded string
buffer[matches[1].rm_eo] = '\0';
const char *url_encoded_file_name = buffer + matches[1].rm_so;
char *file_name = url_decode(url_encoded_file_name);
// If the root route is requested in GET, then respond the index page.
if (strlen(file_name) == 0)
{
strcpy(file_name, "index.html");
}
// Get file extension
char file_ext[32];
strcpy(file_ext, get_file_extension(file_name));
// build HTTP response
char *response = (char *)malloc(BUFFER_SIZE * 2 * sizeof(char));
size_t response_len;
build_http_response(file_name, file_ext, response, &response_len);
// send HTTP response to client
send(client_fd, response, response_len, 0);
free(response);
free(file_name);
}
regfree(®ex);
}
close(client_fd);
free(arg);
free(buffer);
return NULL;
}Server
At last we can focus on our server atrifact which basically use the functions that we created as libraries and utilities. We are going to use following header files and make sure to define a port as PORT. This port will be used to basically expose the services that are implemented in the server side. Note that the application resources will be accessed by following the URL format http://localhost:8080 if you define the PORT as 8080.
#include <sys/socket.h>
#include <netinet/in.h>
#include <stdio.h>
#include <stdlib.h>
#include <pthread.h>
#include <unistd.h>

#include "utils.h"

#define PORT 8080
We can using sys/socket.h library to handle our socket programming related functionalities and netinet/in.h as the internet address family to structure our port mappings and network address translations.
Initially we have to create a socket to expose the server features. Then we can configure the required socket family, IPv4 address and Port number. All together the socket configuration follows basic HTTP URL which is http://localhost:8080 given the port number as 8080.
Then it bind the socket to the port and once its bind other user applications or processes can’t aquire it until its release by our server process. Which simply means, our server will start on the given port and server process has the full control over that port and until the server is terminated the port will be acquired by the server.
Now we can listen from that port for user requests.
Then we can keep listening for user requests by create a continues loop as mentioned in the source code. In here we now accept client requests. Note that here we use pthread functions to invoke the multithreaded executions. Which means that it allows us the execute multiple processes parallely. Then multiple users can use the server resources without waiting on idle time. For each new user, we create a new thread to execute its processes in isolation.
int main(int argc, char const *argv[])
{
    int server_fd;
    struct sockaddr_in server_addr;

    // create server socket
    if ((server_fd = socket(AF_INET, SOCK_STREAM, 0)) < 0)
    {
        perror("socket failed");
        exit(EXIT_FAILURE);
    }

    // config socket
    server_addr.sin_family = AF_INET;
    server_addr.sin_addr.s_addr = INADDR_ANY;
    server_addr.sin_port = htons(PORT);

    // bind socket to port
    if (bind(server_fd,
             (struct sockaddr *)&server_addr,
             sizeof(server_addr)) < 0)
    {
        perror("bind failed");
        exit(EXIT_FAILURE);
    }

    // listen for connections
    if (listen(server_fd, 10) < 0)
    {
        perror("listen failed");
        exit(EXIT_FAILURE);
    }

    printf("Server listening on port %d\n", PORT);

    while (1)
    {
        // client info
        struct sockaddr_in client_addr;
        socklen_t client_addr_len = sizeof(client_addr);
        int *client_fd = malloc(sizeof(int));

        // accept client connection
        if ((*client_fd = accept(server_fd,
                                 (struct sockaddr *)&client_addr,
                                 &client_addr_len)) < 0)
        {
            perror("accept failed");
            continue;
        }

        // create a new thread to handle client request
        pthread_t thread_id;
        pthread_create(&thread_id, NULL, handle_client, (void *)client_fd);
        pthread_detach(thread_id);
    }

    close(server_fd);
    return 0;
}
HTML/CSS and Other Files
Finally create your HTML files at /src directory. Your HTML files can contain CSS and JavaScript syntaxes as well. Also any image, audio or video files will be supported through the HTML pages. And if the direct file access is required make sure you have specify necessary MIME types at the http_helper.h header file’s get_mime_type() function.
For instance, here is the about.html page that I’ve created.
<html lang="en">

<head>
    <meta charset="UTF-8">
    <meta name="viewport" content="width=device-width, initial-scale=1.0">
    <title>C - Web Server</title>
    <link rel="stylesheet" href="./styles/navbar.css">
</head>

<body>
    <!-- Header -->
    <div>
        <ul class="navbar">
            <li><a href="http://localhost:8080/index.html">Home</a></li>
            <li><a href="http://localhost:8080/docs.html">Docs</a></li>
            <li class="active"><a href="http://localhost:8080/about.html">About</a></li>
        </ul>
    </div>

    <!-- Content -->
    <h1>About</h1>

    <hr>

    <h2>Server Details</h2>
    This web server is created using C language to showcase the basic features on a backend web server.
    <ul>
        <li><b>Language: </b><span>C</span></li>
        <li><b>Protocols: </b><span>HTTP</span></li>
        <li><b>Methods: </b><span>GET requests</span></li>
        <li><b>Security: </b><span>None</span></li>
        <li><b>Error Handling: </b><span>Yes</span></li>
    </ul>

    <hr>

    <h2>Developer Details</h2>
    <div style="display: flex; flex-direction: row;">
        <img src="./assets/images/me.jpg" alt="me" style="width: 220px; height: auto; padding-right: 20px;">
        <div style="display: flex; flex-direction: column; gap: 10px;">
            <div><b>Created by - </b> Dhanushka Sandakelum</div>
            <div><b>GitHub Profile - </b> <a href="https://github.com/DhanushkaSandakelum">DhanushkaSandakelum</a></div>
            <div><b>Find me on YouTube - </b> <a href="https://www.youtube.com/@simpleepic">SimpleEPIC</a></div>
            <div><b>Checkout my Blogs on Medium - </b><a href="https://medium.com/@simpleepic">SimpleEPIC</a></div>
        </div>
    </div>

    <hr>
</body>

</html>
Run your server
In order to run your server first you have to compile server.c file. You can do that by using gcc -o server server.c command or you can create a make file that specify all the necessary build commands at one file as Makefile. This helps us to build our server fast without typing the same sequence of codes again and again.
Here is the Makefile content,
CC=gcc
CFLAGS=-I.
DEPS=
OBJ=server.o
USERID=123456789

%.o: %.c $(DEPS)
 $(CC) -c -o $@ $< $(CFLAGS)

all: server
server: $(OBJ)
 $(CC) -o $@ $^ $(CFLAGS)

clean:
 rm -rf *.o server *.tar.gz

dist: tarball
tarball: clean
 tar -cvzf /tmp/$(USERID).tar.gz --exclude=./.vagrant . && mv /tmp/$(USERID).tar.gz .
In order to execute the Makefile, open the CMD in the current project directory and simply type make. Then it will execute make file and build server.c.
$ makeFinally execute the server by typing ./server which run your backend server.
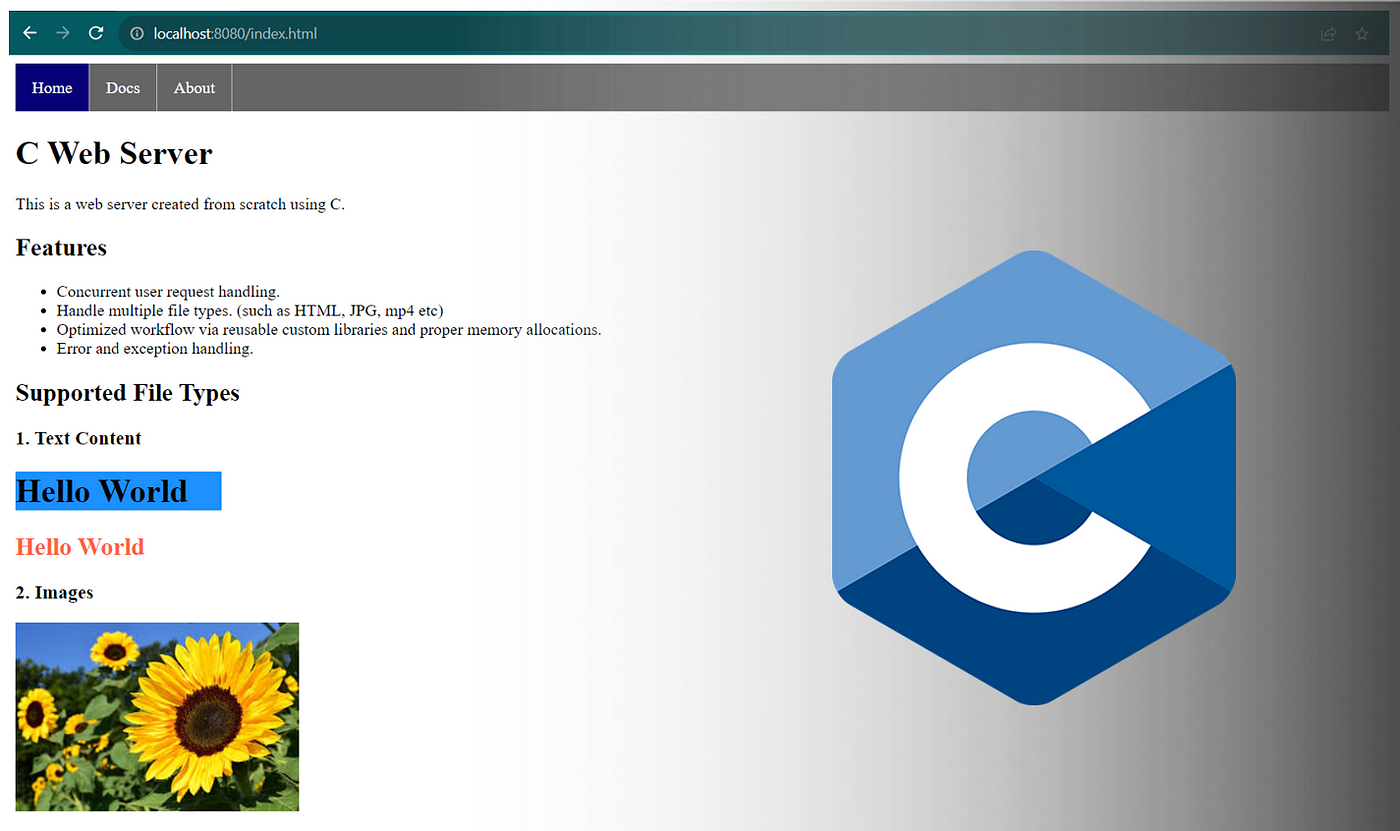
$ ./serverThen open your web browser and simply type http://localhost:8080 which render your index.html web page. likewise if you want to render about page then URL should be http://localhost:8080/about.html
Conclusion
Great. Now you know how to create a fully functional web server from scratch using C language. If you want to get the access to the source code check out this GitHub repo.
GitHub Repository: https://github.com/DhanushkaSandakelum/c-webserver